April 17, 2026 · Sewing Society · 3 min read · Sewing Tips & Hacks, Learn to Sew
Disclosure: As an Amazon Associate, we earn from qualifying purchases. Some links in this post may be affiliate links.
How to Make Better Buttonholes on Your Sewing Machine
Buttonholes don't have to be scary. With the right stabilizer, the correct thread for your fabric, and a few key setup tips, you can sew clean, professional-looking buttonholes every time. Here's a complete guide including tips for all fabric types and a full step-by-step walkthrough for modern sewing machines.
Are your buttonholes stretching, bunching, or just not looking right? You're not alone. Buttonholes are one of those techniques that intimidate even experienced sewists.
I used to avoid them completely. My biggest fear was making a mistake and having to unpick a buttonhole, because unpicking on certain fabrics can mean accidentally snapping threads and ruining the whole project. After years of sewing and plenty of trial and error, I've figured out what actually works. Here's everything I've learned.
Tips for Better Buttonholes on Any Fabric
No matter what type of sewing machine you have, these tips will make a noticeable difference:
Use interfacing or stabilizer behind your fabric. This is the single most important tip. Without it, buttonholes on lightweight, slippery, or knit fabrics will stretch and distort. Interfacing gives the stitches something stable to anchor into.
Use a water-soluble stabilizer on top for textured fabrics. If your fabric is thick or has a nap (like fleece or velvet), a water-soluble topper prevents stitches from sinking into the surface. It dissolves away completely after you're done.
Match your thread to the fabric weight. All-purpose thread can be too heavy for lightweight fabrics. Try polyester or machine embroidery thread for finer results.
Loosen the upper thread tension if you see thread bunching. Start with small adjustments and test on scraps until the stitch looks balanced.
Use a longer stitch length on heavy or bulky fabrics. Too-short stitches perforate the fabric and can cause tearing.
Always sew slowly. Buttonholes go fast and mistakes are very difficult to fix. Slow and steady is always the right approach here.
How to Sew Buttonholes on a Modern Sewing Machine (Step by Step)
If you have an older machine, you'll need to follow your user manual for the specific buttonhole sequence. For modern machines with an automatic buttonhole feature, here's the full process:
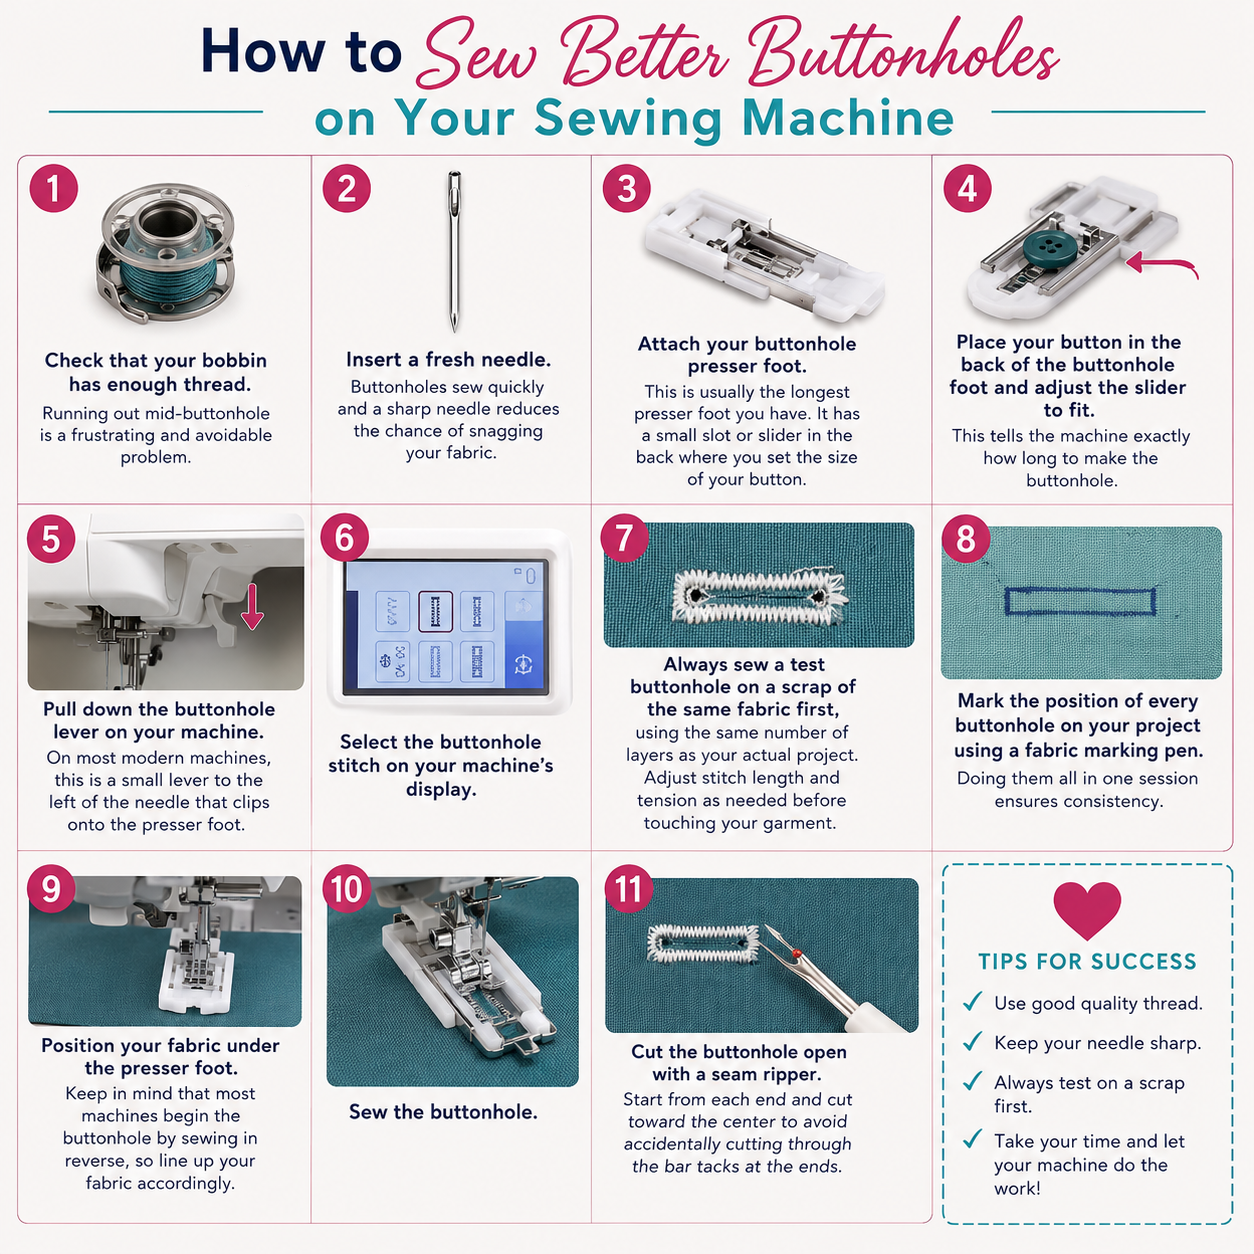
Step 1: Check that your bobbin has enough thread. Running out mid-buttonhole is a frustrating and avoidable problem.
Step 2: Insert a fresh needle. Buttonholes sew quickly and a sharp needle reduces the chance of snagging your fabric.
Step 3: Attach your buttonhole presser foot. This is usually the longest presser foot you have. It has a small slot or slider in the back where you set the size of your button.
Step 4: Place your button in the back of the buttonhole foot and adjust the slider to fit. This tells the machine exactly how long to make the buttonhole.
Step 5: Pull down the buttonhole lever on your machine. On most modern machines, this is a small lever to the left of the needle that clips onto the presser foot.
Step 6: Select the buttonhole stitch on your machine's display.
Step 7: Always sew a test buttonhole on a scrap of the same fabric first, using the same number of layers as your actual project. Adjust stitch length and tension as needed before touching your garment.
Step 8: Mark the position of every buttonhole on your project using a fabric marking pen. Doing them all in one session ensures consistency.
Step 9: Position your fabric under the presser foot. Keep in mind that most machines begin the buttonhole by sewing in reverse, so line up your fabric accordingly.
Step 10: Sew the buttonhole.
 Pin It
Step 11: Cut the buttonhole open with a seam ripper. Start from each end and cut toward the center to avoid accidentally cutting through the bar tacks at the ends.
Repeat for each buttonhole, working in the same order and direction each time.
Related reading: How to Teach Your Kids to Sew (Tips That Actually Work)
AI Sewing Coach
Create a free account to chat with our AI Sewing Coach — trained to help with sewing techniques, troubleshooting, projects, fabric questions, and more!
Comments
Comments are screened by an AI moderator for spam and inappropriate content.
Sign in to join the conversation.
Loading comments…