July 2, 2026 · Sewing Society · 5 min read · Learn to Sew, Sewing Machine Help & Troubleshooting, Sewing Terminology
Disclosure: As an Amazon Associate, we earn from qualifying purchases. Some links in this post may be affiliate links.
What Is a Seam Allowance? (And Why Does It Matter)
Seam allowance is one of those sewing terms that gets mentioned constantly but rarely explained. Here's what it actually means, why getting it right is so important, and how to sew a consistent seam allowance every time.
Have you ever looked at a sewing pattern or watched a sewing tutorial and been confused by the term "seam allowance?" It's one of those terms that gets mentioned constantly in sewing instructions, often without much explanation. And if you don't fully understand it, it can throw off your entire project without you realizing why.
Here's everything you need to know about seam allowance: what it is, why it matters, how to sew it consistently, and what happens when you get it wrong.
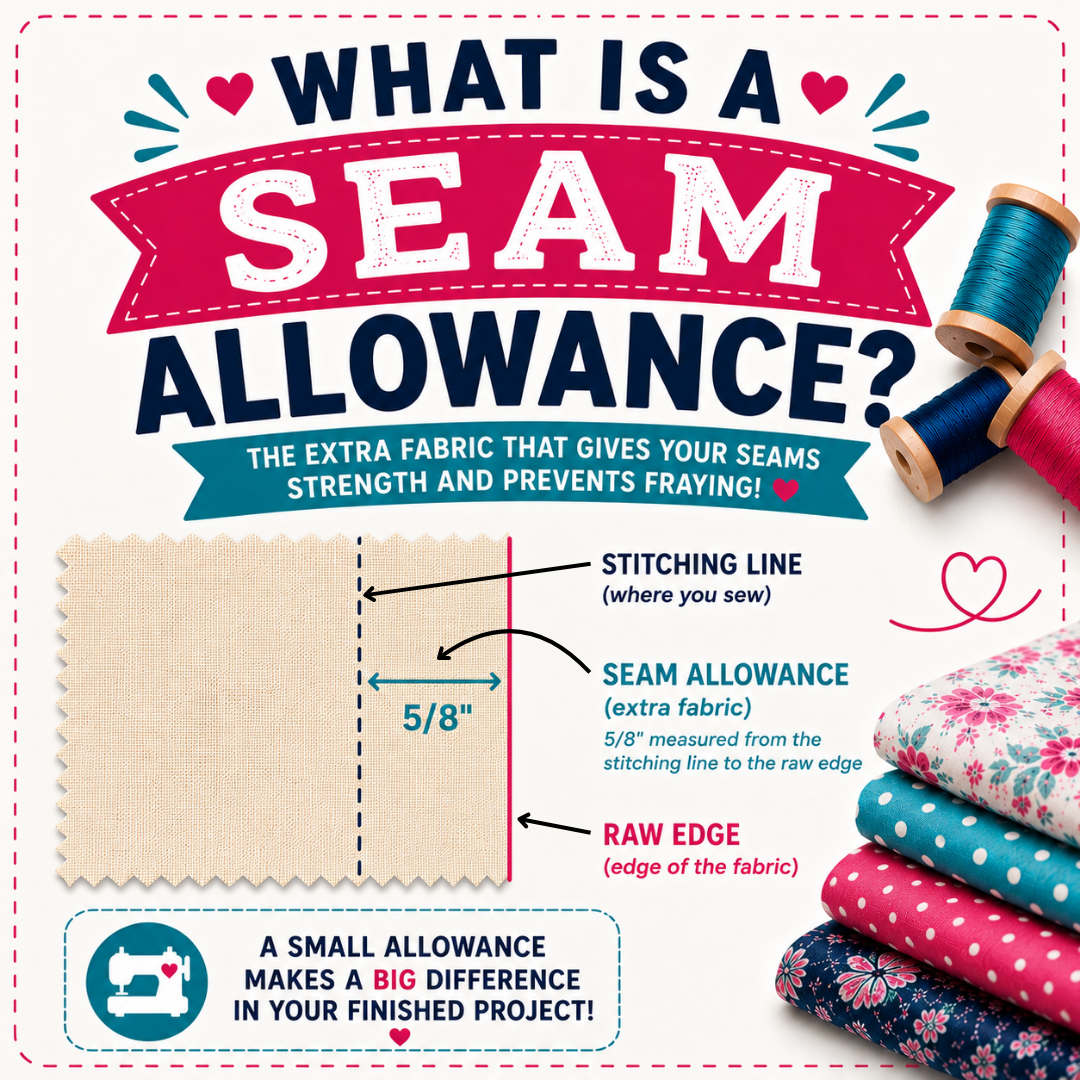
What Is Seam Allowance?
Seam allowance is the distance between the edge of your fabric and the line of stitching that joins two pieces together (where your needle pierces the fabric).
When you place two pieces of fabric right sides together and sew along the edge, you're not sewing right at the very edge of the fabric. You're sewing a certain distance in from the edge. That distance is the seam allowance.
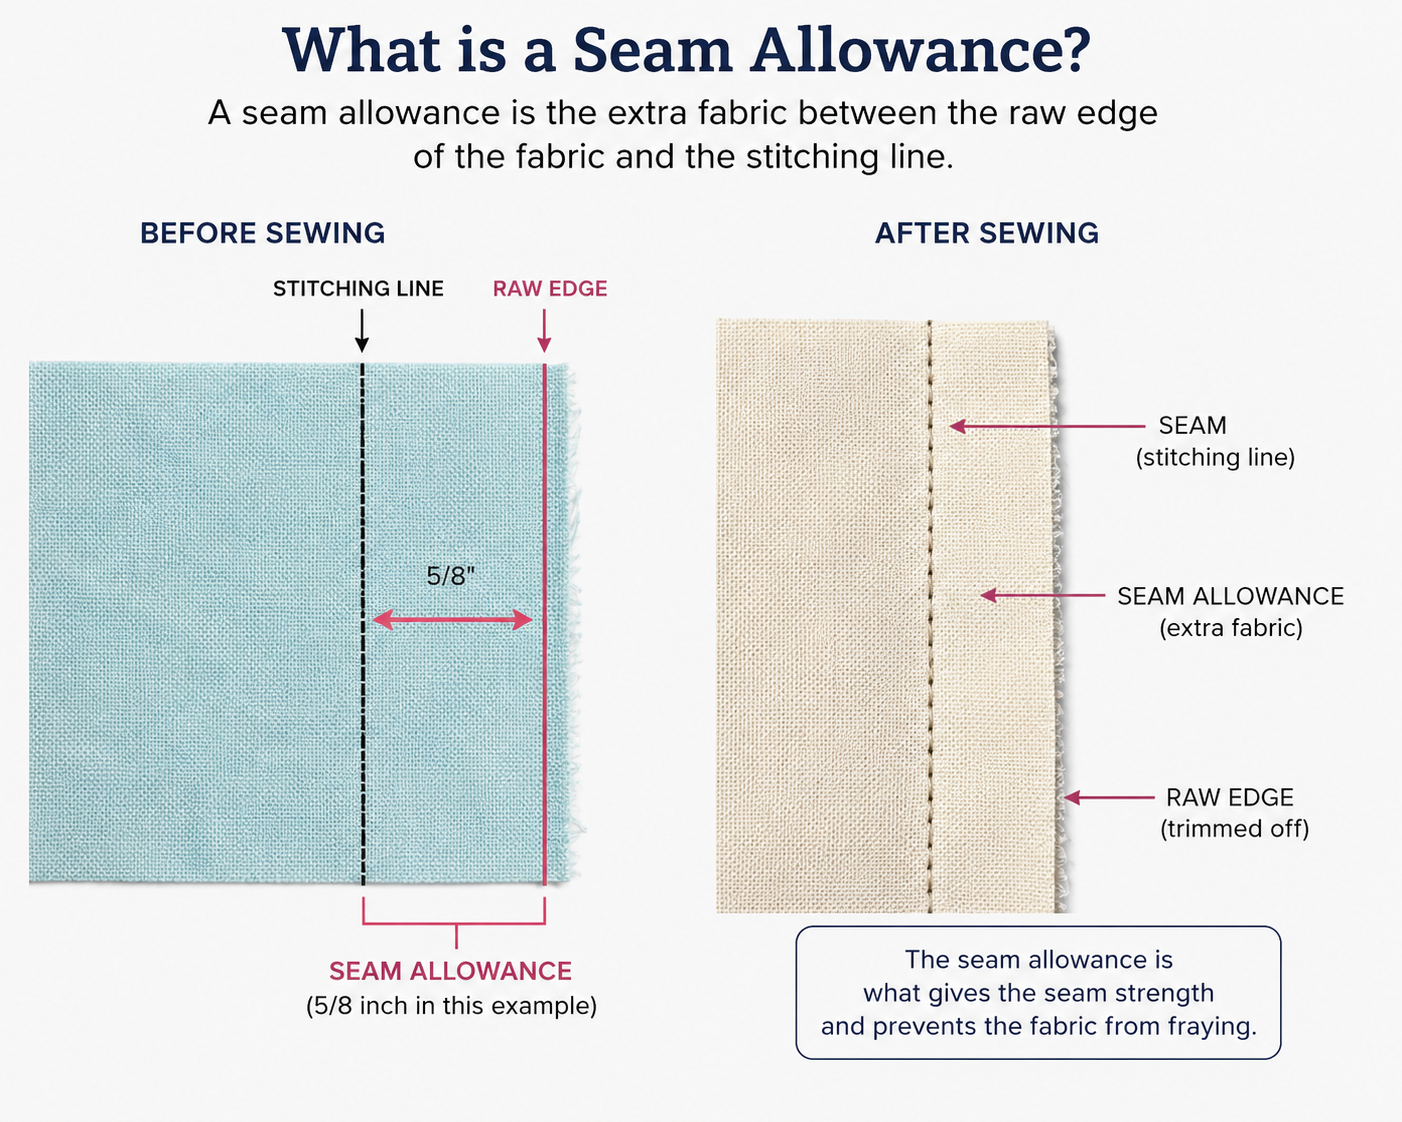
For example, if a pattern says to use a ⅝" seam allowance, you place your fabric pieces together and sew a line of stitching that is ⅝ of an inch from the raw edge. There is typically a marking on your throat plate that indicates where the ⅝" seam allowance is when your needle is in the center position.
The seam allowance is the fabric that sits between the raw edge and your stitch line. It's what gets hidden inside the finished seam and holds everything together.
Why Does Seam Allowance Matter?
Seam allowance matters because using the wrong one can change the size of your finished project, or make your pieces not line up properly. Pattern makers assumes you'll be sewing at a specific distance from the edge of the fabric.
Here's a simple example: If a pattern piece for a pillowcase wants you to use a ½" seam allowance and you sew at ¼" instead, you're adding an extra ¼" of fabric to the finished piece on every seam. Over a few seams, that adds up fast. Your pillowcase will end up too big.
Sew too far in from the edge and your piece will be too small. Sew too close to the edge and your seam won't hold.
Consistent seam allowance is one of the most important habits to build as a beginner because it directly determines whether your finished pieces are the right size.
Common Seam Allowance Measurements
Different types of patterns use different standard seam allowances. Here are the most common ones you'll encounter:
¼ inch (6mm): The standard for quilting. Quilt pieces need to fit together precisely, and a ¼" seam allowance keeps the math clean and the fabric use efficient.
⅝ inch (15mm): The standard for garment sewing in the United States. Most clothing patterns from major pattern companies use ⅝".
½ inch (12mm): Common in home dec sewing like pillows and curtains.
¼ inch: Also used in some bag patterns and small projects.
When you start a new project, the first thing to check is what seam allowance it uses. It will usually be stated in the introduction or at the top of the instructions.
How to Sew a Consistent Seam Allowance
Sewing at a consistent distance from the edge of your fabric is a skill that takes a little practice. Here are the best ways to keep it accurate.
Use Your Machine's Throat Plate Markings
Most sewing machines have engraved lines on the throat plate (the flat metal plate around the needle) that mark common seam allowances. Line up the edge of your fabric with the appropriate marking and keep it there as you sew. This is the easiest method for most beginners. Just be sure that your needle is in the center position.
Use a Magnetic Seam Guide
A magnetic seam guide is a small metal block that attaches to your machine's throat plate and acts as a physical fence for your fabric. It's especially useful for beginners who have a hard time sewing straight consistently. Just place the guide at the right distance from the needle and let the edge of your fabric rest against it as you feed it through.
Use a ¼" Presser Foot
If you're quilting, a ¼" presser foot is a game changer. The edge of the foot is exactly ¼" from the needle, so you just keep the edge of your fabric aligned with the edge of the foot. No measuring, no guessing.
Mark Your Fabric
For curves or when extra precision is needed, you can mark the seam line directly on your fabric using a fabric marking pen and ruler. Then sew along that line rather than measuring from the edge.
What Happens When Your Seam Allowance Is Off
When your seam allowance isn't consistent, a few things can go wrong:
Pieces don't match up. If you sew one seam at ⅝" and another at ½", the pieces won't align when you try to join them.
Finished size is wrong. Garments can end up too tight or too loose. Quilt blocks can end up the wrong size, making it impossible to assemble the quilt correctly.
Seams pull apart. If you sew too close to the raw edge, there isn't enough fabric to hold the seam. It may look fine at first but will come apart with use or washing.
Finishing the Raw Edge
The raw edge of the fabric inside the seam allowance can fray over time, especially after washing. This is why most projects call for finishing the raw edges. A few common ways to do this:
Zigzag stitch or Overlock stitch: Run a zigzag stitch along the raw edge to minimize fraying. Most beginner machines can do this.
Serger: A serger trims the edge and wraps it in thread at the same time, giving a clean factory finish. If you do a lot of sewing, you’ll want to get a serger eventually because it makes it much quicker to finish seams and they look a lot better.
Pinking shears: Scissors with a zigzag blade that cuts a serrated edge, which resists fraying. A simple option that requires no extra machine stitching.
For quilts and projects with a lining, the seam allowances are enclosed inside, so finishing the raw edges usually isn't necessary.
Seam allowance is one of those foundational concepts that underlies everything you make. Once it clicks, a lot of other things in sewing start making more sense. If you're working through your first project and something isn't fitting together the way it should, your seam allowance is almost always the first thing to check.
Related reading: Meet Your New AI Sewing Coach (And Why I'm So Excited About It)
AI Sewing Coach
Create a free account to chat with our AI Sewing Coach — trained to help with sewing techniques, troubleshooting, projects, fabric questions, and more!
Comments
Comments are screened by an AI moderator for spam and inappropriate content.
Sign in to join the conversation.
Loading comments…