Zippers are used in all sorts of garments — jackets, pants, dresses, and more. It is a super helpful closure that gives your projects a polished look.
If you’re intimidated by sewing zippers, we’re going to show you why they are really nothing to worry about. After all, zippers only require straight stitching… The only confusing part is choosing the right one for your project.
We want you to feel confident choosing zippers, shortening them (if needed), and sewing them into your projects. Read this zipper guide to learn more!
Zipper Basics
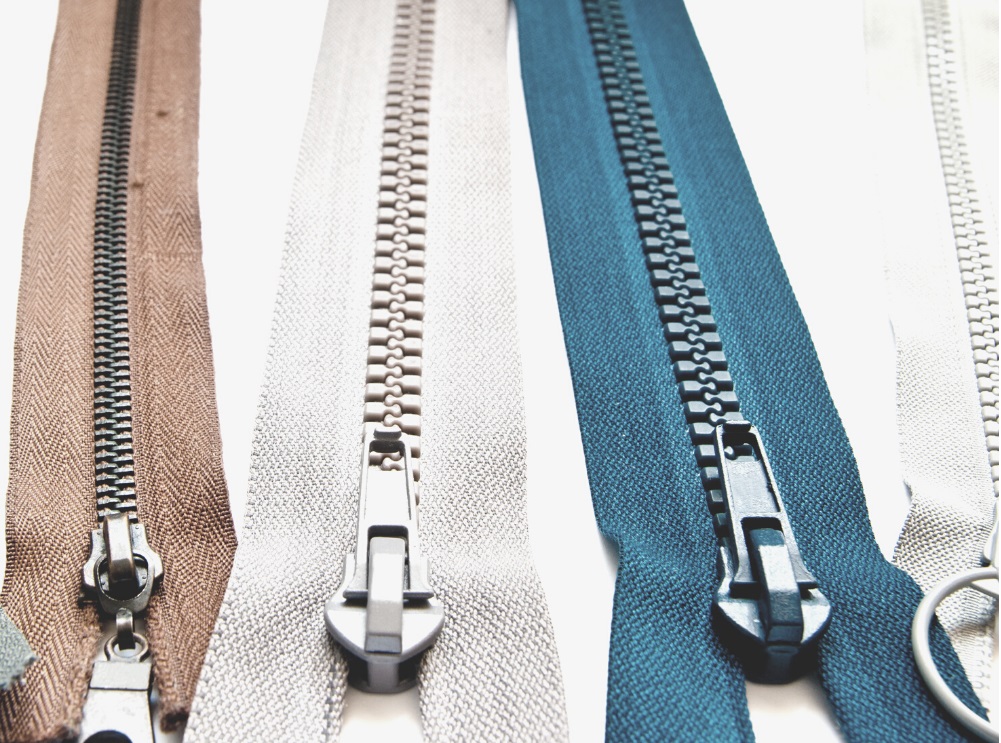
Zippers come in various colors and styles, but there are four main types — closed bottom, separating, invisible, and continuous roll.
Here’s a description of all the zipper types:
- Closed-Bottom: These zippers have a metal or plastic stop across the teeth that holds them together at the bottom and prevents your zipper pull from coming off the end. They are often used in pants, dresses, and bags.
- Separating: As their name suggests, these zippers come apart at the bottom. They are mostly used along the front of coats and jackets.
- Invisible: These zippers are a little different because they have very fine teeth that are on the back side of the zipper tape. When sewn correctly, invisible zippers are hidden within your seam and all you see is a small zipper pull. They are most commonly used in formalwear.
- Continuous Roll: Also known as ‘Zipper on a Roll,’ these zippers are very long and can be cut to any size you need. They come with several zipper pulls and are good for projects that require a very long zipper.
Both closed-bottom and separating zippers come in three styles — molded plastic, coil, and metal. Invisible zippers and continuous roll zippers are typically made from nylon coil.
Here’s a description of all the zipper styles:
- Molded Plastic: These zippers have large interlocking teeth that give them a chunky appearance. They are made by melting plastic directly onto the zipper tape. Molded plastic zippers are commonly used in jackets and bags because they are not flexible enough for most garment sewing projects.
- Coil: These zippers are lightweight and flexible. They are made from nylon or polyester and are smooth to the touch. Coil zippers are stitched or woven into the zipper tape.
- Metal: These zippers have metal teeth that are clamped onto the zipper tape. They are the most durable zippers, but the teeth are prone to sticking. Metal zippers come in different metal finishes, such as brass, nickel, rose gold, and gunmetal.
Zippers come in different sizes that are expressed by a number (#). That number refers to the width of the teeth in millimeters. #3 and #5 zippers are the most common for garment construction.
Your pattern will typically recommend what size to use, but in general, smaller zippers are best for skirts, pants, and dresses, while larger zippers are best for jackets and purses.
How to Shorten a Zipper
Ideally, you should buy a zipper that is the right length for your project. However, it’s not difficult to shorten a zipper that is a little too long. The way you do this depends on the type of zipper you’re using.
Coil zippers are easy to shorten. You simply cut across the bottom with a pair of scissors. Then, you can create a new stop by sewing a bar tack across the teeth at the bottom.
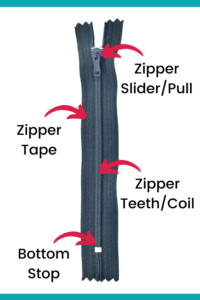
Zippers are measured from the top stop to the bottom stop, so be sure to cut your zipper 1-2 inches longer than you need so that you have a little tail to work with.
Molded plastic zippers can be cut the same way as coil zippers, but we recommend you avoid cutting them altogether because they can damage your scissors.
Shortening a zipper with metal teeth is a little different because you shorten it from the top instead of the bottom. First, mark where your zipper needs to be cut and then use a side cutter or pliers to pull some of the teeth out of the way before cutting. You should not just cut the teeth because they will ruin your scissors.
After cutting a zipper, use a little Fray Check to prevent the zipper tape from fraying.
How to Sew a Zipper
Regardless of the type of zipper you are sewing, you will need a zipper foot. Most sewing machines come standard with this accessory. It is designed to glide next to the teeth of your zipper to help you sew in a straight line.
When sewing zippers, invisible tape is your friend. We suggest using Wonder Tape to position your zipper because it disappears after washing. Sewing clips are also useful in holding your zipper against your fabric.
To sew a zipper, simply line up your zipper tape with the edge of your fabric and use a straight stitch with your zipper foot along the entire length of your zipper. Repeat this process on the other side. Most zipper feet can be attached on the right or left side so you can stitch your zipper in the same direction on both sides.

Be extra careful not to sew over the teeth of metal zippers because they can break your needle!
If you’re still nervous, here are links to some good tutorials on YouTube on how to sew a zipper:
- How to Sew a Zipper, Two Ways
- How to Sew an Invisible Zipper
- How to Insert a Lapped Zipper
We hope this post has been helpful and that you’ve gained some confidence to tackle sewing projects with zippers. Zippers are not difficult at all!
Share this post on Pinterest!