August 18, 2025 · Sewing Society · 4 min read · Patterns & Projects
Disclosure: As an Amazon Associate, we earn from qualifying purchases. Some links in this post may be affiliate links.
How to Add a Fabric Basket Weave Detail to a Sewing Pattern (Mama Catherine Hack)
I've made the Mama Catherine blouse over 20 times — but this version might be my favorite yet. I hacked the yoke with a fabric basket weave detail that makes the whole shirt look boutique-worthy, and it's so much easier than it looks. Here's exactly how I did it, step by step.

If you've been following along here for a while, you already know how much I love the Mama Catherine blouse pattern from Made for Mermaids. I love the soft gathers below the yoke, the loose and flattering fit, and the fact that it works beautifully in so many different fabrics.
So when St. Patrick's Day was coming up and I realized I had almost no green in my wardrobe, I knew exactly what pattern I was reaching for. I picked up a gorgeous olive-green double-brushed poly from KnitFabric.com and got to work. But this time, I decided to try something a little different. I hacked the yoke with a basket weave detail…
And honestly? I'm obsessed with how it turned out. It takes a simple, casual top and makes it feel intentional and a little bit dressy.
The best part: it's much easier than it looks.
Why the Mama Catherine Is My Go-To Blouse Pattern
Before I get into the hack, let me give you a quick rundown on the pattern in case you're not familiar with it. The Mama Catherine from Made for Mermaids is a loose-fitting knit blouse with a split yoke, soft gathers below the yoke seam, and several sleeve options. It requires 2–2.5 yards of fabric depending on which sleeves you choose.
I almost always make mine in double-brushed poly. Cotton lycra works too, but I find it a little stiff for this particular style — DBP gives you that flowy, drapey look that really makes the gathers shine. If you haven't tried this pattern yet, it's a great addition to your sewing rotation.
The Fabric Basket Weave Hack: Step by Step
This technique works on the yoke piece of the Mama Catherine, but you could adapt it for any pattern piece that has a defined, relatively flat section — a pocket, a bodice front, a collar, really anything.
Here's exactly how I did it:
Step 1: Cut your fabric strips. Cut strips of your fabric about 4 inches wide. The number of strips you need will depend on the size of your yoke piece — cut more than you think you'll need so you're not scrambling mid-weave.
Step 2: Sew the tubes. Fold each strip in half lengthwise with right sides together and sew along the long raw edge. Then turn each tube right side out so the seam is hidden inside. A tube turner tool makes this step so much faster and easier. I highly recommend having one on hand if you plan to do this technique again.
Press each tube flat with your iron so the seam runs along the middle. This keeps them neat and tidy for weaving.
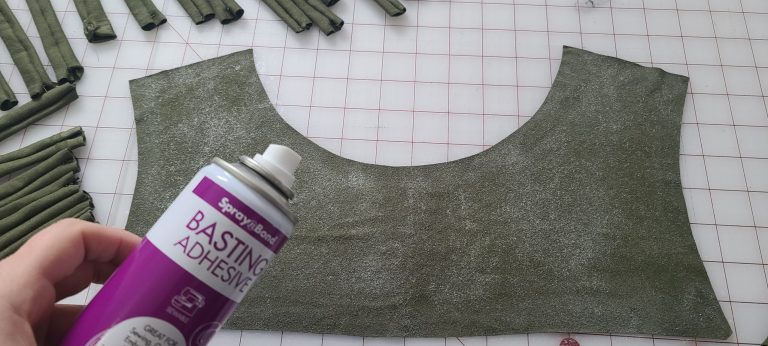
Step 3: Apply basting adhesive to your yoke piece. Spray basting adhesive lightly over the right side of your yoke pattern piece. This is the secret weapon that holds everything in place while you work — without it, the strips will shift around and drive you crazy. Don’t worry — the basting adhesive washes out.
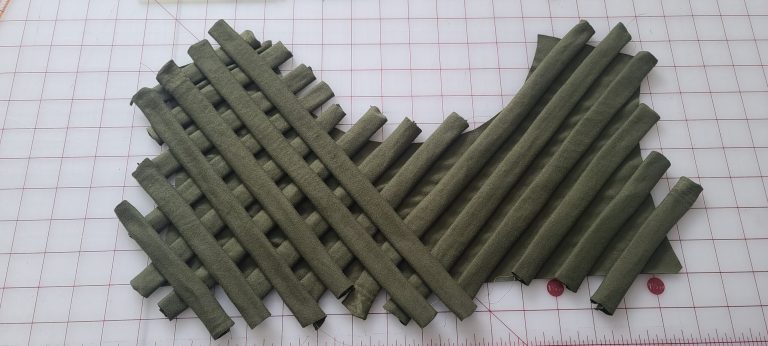
Step 4: Weave the strips. Start laying your tubes across the yoke piece at a 45-degree angle. Use a ruler to keep them consistent. Once you have all your diagonal strips going one way, start weaving strips going the other direction, going over and under alternately to create the basket weave pattern. Take your time here until you get them looking just right. The basting adhesive will hold everything in place.
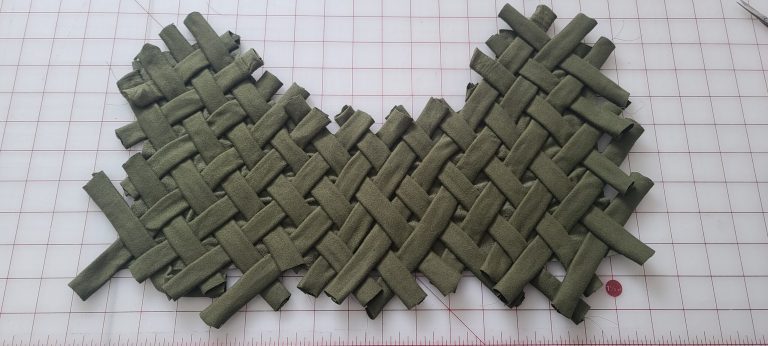
Step 5: Sew Around the edges. Once you're happy with how it looks, sew a basting stitch around the entire edge of the yoke piece. This permanently secures the strips before you assemble the garment.
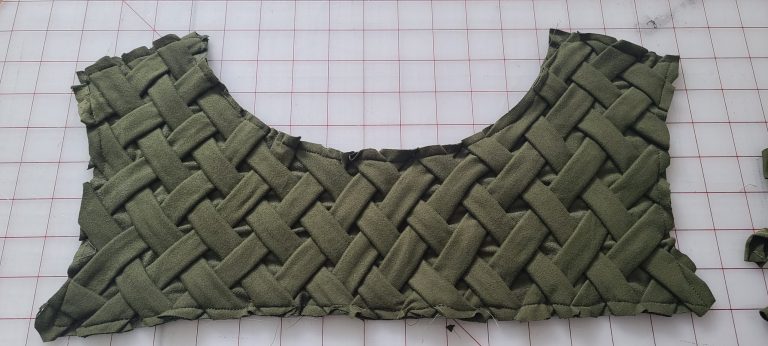
Step 6: Trim and sew as normal. Flip the yoke piece over and trim off any strips that extend beyond the edges. Now your yoke is ready to be sewn into the shirt just like normal — no special steps needed from here.

Tips for Getting the Best Results
Use the same fabric for the strips as the rest of the shirt. This gives a cohesive, intentional look. You could also use a contrasting fabric for a bolder statement — both work!
Press your tubes well before weaving. Flat, crisp tubes are much easier to work with and give a cleaner finished result.
Don't skip the basting spray. It makes the whole process so much more manageable.
Cut more strips than you think you need. Running out mid-weave is frustrating. Extra strips can always be set aside.
This works on wovens too. If you want to try this on a woven blouse or dress, just interface your fabric strips lightly so they hold their shape.
The Finished Result
I'm so happy with how this olive-green Mama Catherine turned out. The basket weave detail on the yoke elevates the whole shirt. It looks like something you'd buy at a boutique rather than something you made at home. Green is officially making its way into my wardrobe!
Have you tried any hacks on the Mama Catherine pattern? I'd love to see what you've made — leave a comment below or tag me on Instagram!
Related reading: A Harry Potter Shirt for My Sister (Butterick B6418 Review)
AI Sewing Coach
Create a free account to chat with our AI Sewing Coach — trained to help with sewing techniques, troubleshooting, projects, fabric questions, and more!
Comments
Comments are screened by an AI moderator for spam and inappropriate content.
Sign in to join the conversation.
Loading comments…