November 18, 2025 · Sewing Society · 5 min read · Learn to Sew, Sewing Machines, Sewing Machine Help & Troubleshooting
Disclosure: As an Amazon Associate, we earn from qualifying purchases. Some links in this post may be affiliate links.
The Anatomy of a Sewing Machine: Every Part Explained
New to sewing? Before you thread a needle or press a foot pedal, you need to know what you're working with. This beginner's guide walks you through all 21 parts of a sewing machine, from the spool pin at the top to the foot controller on the floor, with clear explanations of what each part does and why it matters.
If you've never used a sewing machine before, learning the parts and what they do is an essential first step. That's exactly what this post is for! I'm going to walk you through the anatomy of a sewing machine from top to bottom.
One thing to keep in mind: every sewing machine is a little different. The basic parts will be the same, but they may be in different spots depending on your machine. I'll point out what to look for as we go, but your user manual will have a diagram specific to your model. Try to find each part on your actual machine as you read through this guide!
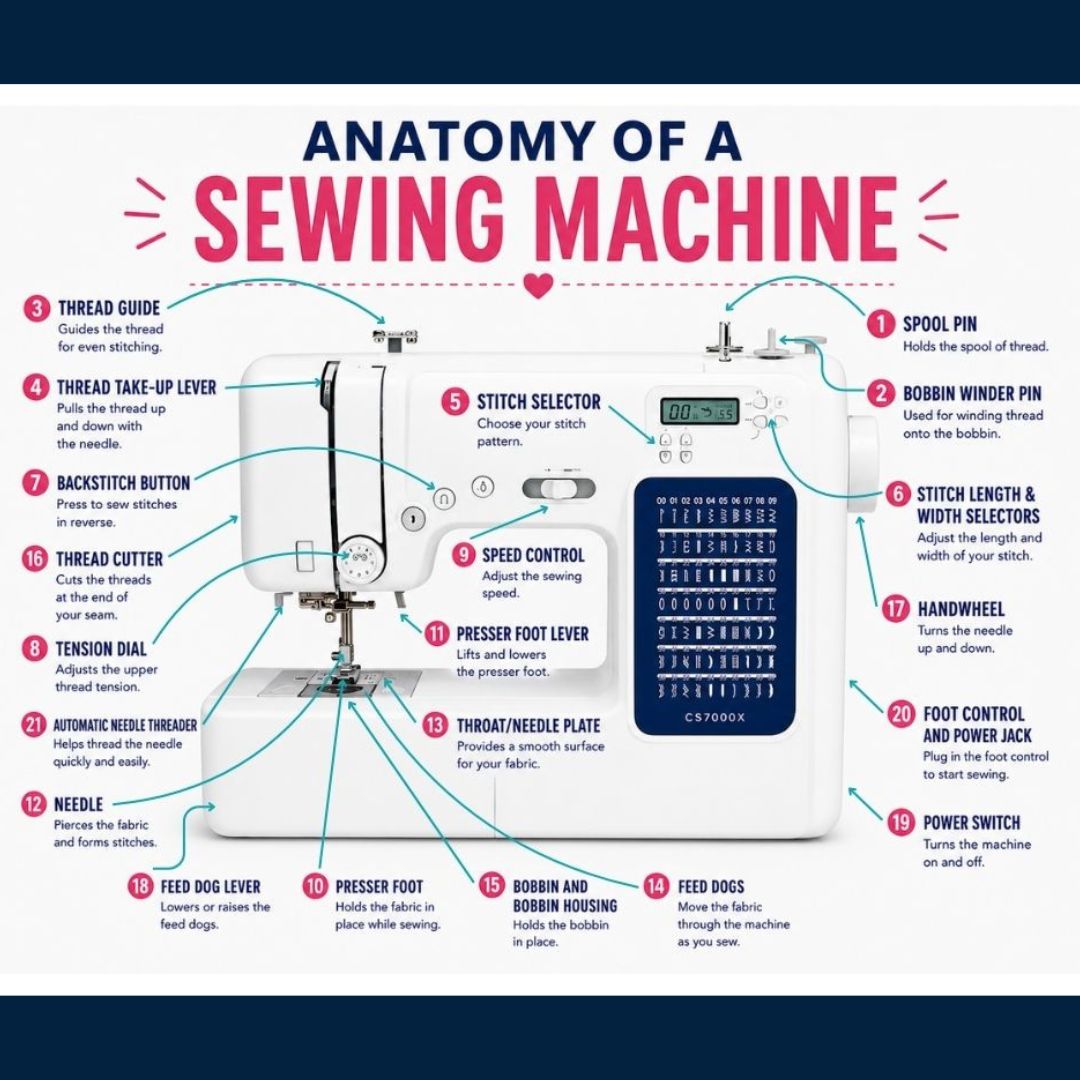
The machine used in the diagram below is the Brother CS7000X, a popular choice for beginners. You can read my full review of it HERE.
The Top of Your Machine
1. Spool Pin The spool pin is where you place your spool of thread. It's at the very top of your machine and can be either vertical or horizontal. If yours is horizontal, you'll need a spool cap (a small disk) to keep the thread in place.
Note: Most machines also have a secondary spool pin attachment for using a second thread spool, which is necessary when sewing with a twin needle. It often attaches to the bobbin winder pin.
2. Bobbin Winder Pin Also at the top, usually on the far right, the bobbin winder pin is where you place an empty bobbin to wind it with thread. You typically engage it by sliding the bobbin to the right. I have a separate post on how to wind a bobbin HERE if you need it.
3. Thread Guide Most machines have several thread guides, but there's one at the very top that you'll use both when winding a bobbin and when threading your machine. It keeps your thread from tangling as it comes off the spool.
The Front of Your Machine
4. Thread Take-Up Lever Moving down the front of your machine, the thread take-up lever is a metal piece that moves up and down while you sew. When threading your machine, your thread must catch the lever. Make sure it is in its highest position before you begin to thread.
5. Stitch Selector The stitch selector lets you choose which stitch your machine will sew: straight, zigzag, buttonhole, decorative, and so on. On a mechanical machine, it's usually a knob you turn. On a computerized machine, you'll select a stitch number on an LCD display. It's typically found on the front right of your machine.
6. Stitch Length and Width Selectors These can be buttons or knobs, also usually found on the front right. Always test your stitch settings on a scrap of fabric before sewing your actual project.
7. Backstitch Button or Lever This lets you sew in reverse, which is how you lock your stitches at the start and end of a seam. On a mechanical machine, it's usually a lever on the lower front right that you press and hold while sewing. On a computerized machine, it could be anywhere on the front panel but is often near the thread take-up lever.
8. Tension Knob or Dial The tension dial controls how tightly your upper thread is pulled through the machine. The goal is balanced stitches that look the same on both sides of your fabric. This dial is usually found near the thread take-up lever. Your bobbin also has its own separate tension adjuster.
9. Speed Control If your machine has a speed control, it is typically a sliding lever on the front center of your machine. Start on a lower setting when you're learning and work your way up as you get comfortable.
Near the Needle
10. Presser Foot The presser foot is attached near the needle and keeps constant pressure on your fabric as you sew to keep it flat. It's easy to swap out for different feet depending on what you're working on.
11. Presser Foot Lever Usually found to the right of or behind the presser foot, this lever raises and lowers the foot. Always raise it when putting fabric under the needle, then lower it before you start sewing.
12. Needle Your needle sits just above the presser foot and can be swapped out to match your fabric. You'll change your needle often, so keep a good supply on hand!
13. Throat Plate The throat plate (or needle plate) is the metal piece just below the presser foot. It has slots for the needle to pass through to connect with the feed dogs and bobbin thread underneath. Most throat plates also have measurement lines to help you sew consistent seam allowances.
14. Feed Dogs The feed dogs look like little teeth below the presser foot. They grip your fabric and move it through the machine as you sew. Their speed is controlled by the foot pedal or the machine's speed setting.
15. Bobbin and Bobbin Housing Bobbins hold the thread that forms the underside of your stitches. They can be either drop-in (accessible through the throat plate) or front-loading (accessed through a panel at the front of your machine). Where your bobbin lives depends on your machine's design.
The Sides of Your Machine
16. Thread Cutter The thread cutter cuts your thread when you're done sewing. It's either a button on the front of your machine or a small blade on the left side.
17. Handwheel Found on the right side of your machine, the handwheel lets you manually move the needle up and down. Always turn it toward you. Turning it backward can throw off your machine's timing.
18. Feed Dog Lever Usually on the left side or back of your machine, this switch raises and lowers the feed dogs. You only need to lower them for things like free-motion quilting.
19. Power Switch Also on the right side, near the power cord connection. When you turn your machine on, the light should come on too.
20. Foot Controller The foot controller sits on the floor and controls when your needle moves and how fast. It connects to your machine via a cord that plugs into the right side or back of the machine.
21. Needle Threader Not every machine has one, but if yours does, you'll find a small lever to the left of the needle. Pull it down while threading and it will catch your thread and pull it through the eye of the needle automatically. It's a really handy feature, especially if you have trouble seeing small details!
Every sewing machine is a little different, and higher-end models may have bonus features not covered here, like a needle up/down button or a built-in dual feed. Always read your user manual so you can take full advantage of everything your machine can do!
If you haven't bought a machine yet, check out my post on the Best Sewing Machines for Beginners. I highly recommend the Brother CS7000X for the best value.
Related reading: How to Clean Your Sewing Machine
AI Sewing Coach
Create a free account to chat with our AI Sewing Coach — trained to help with sewing techniques, troubleshooting, projects, fabric questions, and more!
Comments
Comments are screened by an AI moderator for spam and inappropriate content.
Sign in to join the conversation.
Loading comments…