June 14, 2026 · Sewing Society · 4 min read · Quilting
Disclosure: As an Amazon Associate, we earn from qualifying purchases. Some links in this post may be affiliate links.
The Correct Way to Press Quilt Seams (Beginner's Guide)
Pressing quilt seams correctly is one of the most important steps for a flat, polished quilt. Learn the two main methods, when to use each one, and seven practical tips for getting professional results every time.
Have you ever looked at a beautiful quilt and wondered what makes it look so polished and professional? The answer might lie in a seemingly small detail: how the seams were pressed. Pressing is about more than removing wrinkles. It affects the way your quilt lays flat and how smooth the quilting turns out.
No one wants a lumpy, bumpy quilt! Bulky, unpressed seams make it difficult for your quilt top to lay flat, and quilting over them becomes a real challenge. A little thought and care during the pressing stage can make a huge difference in your finished project.
Here's the thing though… Not everyone agrees on the best way to press quilt seams. In this post, I'll walk you through two different methods, when to use each one, and how your choice will affect the final look and feel of your quilt.
Open or to One Side? Choosing Your Pressing Direction
There are two ways to press quilt seams: open or to one side. Each method has its advantages and trade-offs, and the right choice depends on your project and quilting style.
Pressing Seams to One Side
This is the most traditional method, and for good reason. Pressing seams to one side creates stronger seams and forms convenient nesting points that make matching up quilt blocks much easier. It also simplifies stitch-in-the-ditch quilting by creating a small divot that's easy to follow with your needle.
Another bonus: when you press toward the darker fabric, the lighter fabric is hidden behind it, preventing any shadowing on the front of your quilt. This is why quilters often say to "press to the dark side."
The trade-off is that the extra bulk along the seam can slightly alter your block dimensions and make free-motion quilting more challenging.
Pressing Seams Open
Pressing seams open reduces bulk and results in a flatter quilt top, which is ideal for intricate free-motion quilting designs. The downside is that it takes more time and effort to carefully wiggle each seam open, and the seams are not quite as strong or as easy to match up.
So, Which Should You Choose?
Consider your quilting style. If you prefer stitch-in-the-ditch quilting, pressing to one side is likely your best bet. If free-motion quilting is your thing, pressing open will give you a flatter surface to work with.
For longer seams like borders and sashing, pressing open is generally recommended to prevent distortion and puckering. And don't be afraid to mix both methods within the same project! A combination approach can give you the best of both worlds. A little planning goes a long way.
7 Tips for Pressing Quilt Seams Like a Pro
There's more to pressing than simply choosing a direction. These tips will help you get better, more consistent results every time.
1. Press on a Wool Pressing Mat
Wool has excellent heat-retention properties, which helps you achieve flatter seams. The mat absorbs heat from the iron and heats the seam from both sides at once. As an added bonus, you won't need steam or spray starch, both of which can distort your blocks.
2. Press as You Sew
Don't wait until the end of your project to press all your seams at once. Press in batches as you piece your blocks together. This makes nesting seams easier and keeps everything flat from the start.
3. Finger Press First
Before reaching for your iron, use your finger to guide the seam in the right direction. This small step can prevent puckers before they start.
4. Check Your Pattern
Many quilt patterns include pressing instructions. Follow them when they're provided. It saves time and takes the guesswork out of planning.
5. Press, Don't Iron
Use an up-and-down motion rather than sliding the iron back and forth. This gentle lifting motion keeps your seams straight and accurate and prevents distortion.
6. Protect Your Fingers
When pressing intricate seams, use thermal fingers so you can hold the fabric in place right up until the iron touches it.
7. Take Your Time
Don't rush the pressing process. Press each seam thoroughly and evenly, then inspect your work for any puckering. A well-pressed seam is worth the extra minute it takes.
Quilt Seam Pressing Demonstration
If you need a more visual demonstration of how to press quilt seams, I created a quick video for you.
Youtube: https://www.youtube.com/watch?v=6lFcWIN0nU8
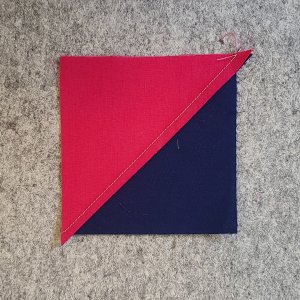
How to Press Seams to One Side
Start by giving your pieces a quick press to set the seam. Then, place the dark fabric on top and gently pull it open to the side, keeping the seam flat with the dark side of the fabric on top. Press firmly so the seam stays in place. Flip the fabric over and check that the seam lies flat and smooth on the back. If you spot any wrinkles or puckers, re-press as needed. A wool pressing mat and a quilter's clapper work great here to keep everything flat as the fabric cools.
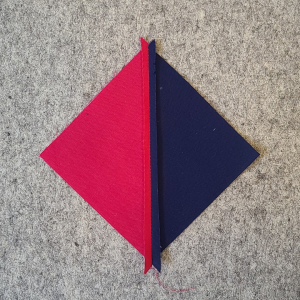
How to Press Seams Open
 Pin It
Lay your block out flat with the wrong side facing up. Use your finger to open the seam slightly to get it started. Run the iron along the inside of the seam, using the nose of the iron to gently wiggle it open as you go. Hold the iron in place for a few seconds, then release. Flip the block over and press from the top as well. A quilter's clapper is helpful here too for setting the seam as it cools.
Have questions about pressing quilt seams? Leave a comment below. I'd love to help!
Related reading: Why So Many Quilters Swear by Wool Pressing Mats
AI Sewing Coach
Create a free account to chat with our AI Sewing Coach — trained to help with sewing techniques, troubleshooting, projects, fabric questions, and more!
Comments
Comments are screened by an AI moderator for spam and inappropriate content.
Sign in to join the conversation.
Loading comments…